Roof rails and crossbar (if equipped)

CAUTION
• For cargo carrying purposes, the roof rail must be used together with a roof crossbar kit and the appropriate carrying attachment.
The roof rail must never be used alone to carry cargo. Otherwise, damage to the roof or paint or a dangerous road hazard due to loss of cargo could result.
• When using the roof crossbar kit, make sure that the total weight of the crossbars, carrying attachments and cargo does not exceed the maximum load limit.
Overloading may cause damage to the vehicle and create a safety hazard.
The roof rails are not designed to carry cargo by themselves. Cargo can be carried after securing the roof crossbar kit to the roof rail and installing the appropriate carrying attachment. When installing the roof crossbar kit, follow the manufacturer’s instructions.
When you carry cargo on the roof using the roof crossbar kit and a carrying attachment, never exceed the maximum load limit as explained below. You should also be careful that your vehicle does not exceed the Gross Vehicle Weight Rating (GVWR) and front and rear Gross Axle Weight Rating (GAWR). For information on loading cargo into or onto your vehicle, refer to “Loading your vehicle”. The maximum load limit of the cargo, crossbars and carrying attachments must not exceed 150 lbs (68 kg). Place the heaviest load at the bottom, nearest the roof, and evenly distribute the cargo.
Always properly secure all cargo.
▲ Installing carrying attachments on the crossbars
When installing any carrying attachments such as a bike carrier, ski carrier, kayak carrier, cargo basket, etc. on the crossbars, follow the manufacturer’s instructions and make sure that the attachments are securely fixed to the crossbars. Use only attachments designed specifically for the crossbars. The maximum load limit of the cargo, crossbars and carrying attachments must not exceed 150 lbs (68 kg).
Before operating the vehicle, make sure that the cargo is properly secured on the attachments.
NOTE
Remember that the vehicle’s center of gravity is altered with the weight of the load on the roof, thus affecting the driving characteristics.
Drive carefully. Avoid rapid starts, hard cornering and abrupt stops. Crosswind effects will be increased.
▲ Removal and installation of the crossbars
The crossbars can be removed when you do not use the roof to carry cargo.
▲ To remove the crossbar
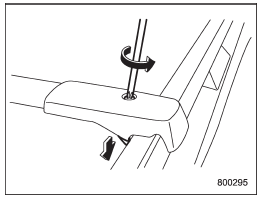
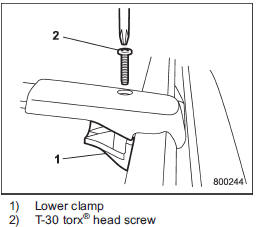
1. Loosen and remove the T-30 torx® head screw from the top of each crossbar end support.
Loosen the lower clamps.
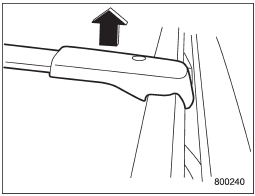
2. Carefully raise the crossbar from roof rails.
▲ To install the crossbar
Front crossbar:
Front crossbar has a 150 lbs (68 kg) load label on left-hand side.
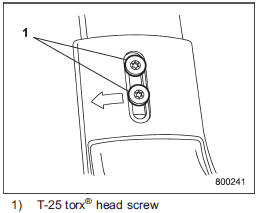
1. Make sure that the T-25 torx® head screw on the back of each crossbar end support is tightened correctly.
2. Before placing the crossbar on the roof rails, make sure that the T-30 torx® head screw is removed from the top of each crossbar end support.
3. The crossbar with a 150 lbs (68 kg) load label attached onto it is the front crossbar. An arrow is marked on the back of the front crossbar for correct installation.
Install the front crossbar so that the arrow faces the front of the vehicle.
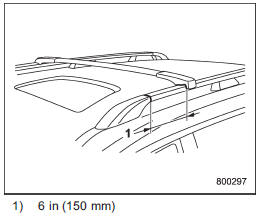
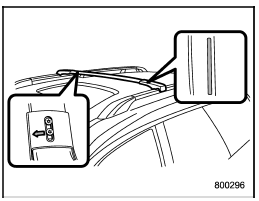
4. Install the front crossbar so that the crossbar end supports are located approximately 6 in (150 mm) rearward from the joints between the roof rails and the front roof rail supports.
5. Tighten the lower clamps onto the crossbar. Using a torque wrench, loosely tighten the T-30 torx® head screws.
NOTE
It may be necessary to squeeze the lower clamp and the end support together to compress the pads and gain a better alignment of the pieces while trying to start the screw. Use care not to cross-thread the screw in the insert.
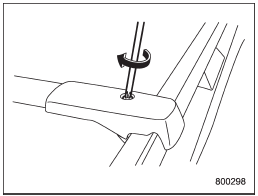
6. Adjust the alignment of the crossbar on the roof rails, and if available, use a T- 30 torx® bit and torque wrench and tighten the T-30 torx® head screws to 30 to 35 lbf·in (3.4 to 4.0 N·m, 0.35 to 0.41 kgf·m) of torque (or tighten securely with the torx® wrench provided).
Rear crossbar:
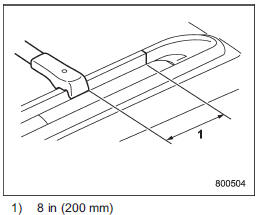
Install the rear crossbar so that the crossbar end supports are located approximately 8 in (200 mm) forward from the joints between the roof rails and the rear roof rail supports.
Install the rear crossbar in the same manner as the front crossbar.
CAUTION
Do not carry cargo on the roof when the crossbars are removed. Luggage on the roof will be thrown forward or backward in sudden stops or rapid accelerations, resulting in a dangerous road hazard.
NOTE
Before each use of the roof crossbar, make sure the four T-30 crossbar clamp screws have been checked, and retightened if necessary to 35 lbf·in (4.0 N·m, 0.41 kgf·m), as outlined in Step #5 above.