Radio operation
(1) Satellite radio mode button
(2) FM AM mode button
(3) Auxiliary audio unit and Rear seat
entertainment selection button
(4) Tuning button
(5) AUDIO button
(6) Power switch, volume control dial
(7) Seek button
(8) Scan button
(9) Tone and Balance button
(10) Preset button
▲ Power switch and volume control
The dial (6) is used for both power (ON/ OFF) and volume control. The radio is turned ON and OFF by pushing the dial and the volume is controlled by turning the dial. The dial can also be used for tone and balance adjustment.
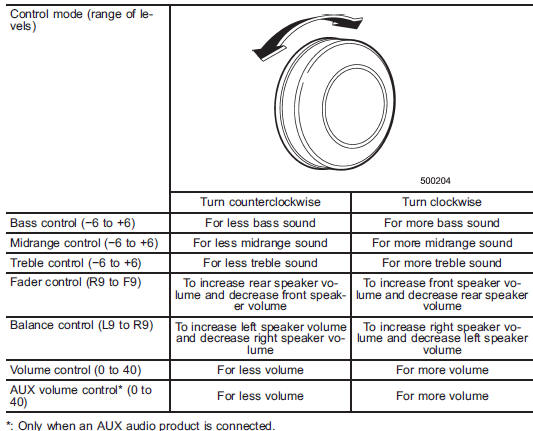
▲ Tone and balance control
The volume control dial (6) normally functions as a volume control. This dial becomes a control for Bass, Midrange, Treble, Fader or Balance when you select the appropriate tone and balance control mode.
Choose desired volume level for each mode by turning the volume control dial.
The control function returns to volume control mode after approximately 5 seconds.
▲ To change tone and balance control modes
Each brief press of the “TONE BAL” button (9) changes control modes in the following sequence starting from volume control mode. (When the radio is first turned on, the control mode is in the volume control.)
The “TONE BAL” button is used for selecting the following control modes.
▲ FM/AM radio
▲ FM/AM selection button
Push the “FM AM” button (2) when the radio is off to turn on the radio.
Push the “FM AM” button when the radio is on to select FM1, FM2 or AM reception.
▲ Stereo indicator
The stereo indicator “ST” will illuminate when an FM stereo broadcast is received.
▲ Manual tuning
Press the  side of the “TUNE
TRACK”
button (4) to increase the tuning frequency
and press the  side of the button
to
decrease it.
Each time the button is pressed, the frequency interval can be changed between 10 kHz in the AM mode and 0.2 MHz in the FM mode.
If you hold down the  side of the
button, the tuning frequency will increase
continuously, and if you hold down the

side of the button, the tuning frequency
will decrease continuously. Release the
button when your desired frequency is
reached.
NOTE
While you are holding down either side of the “TUNE TRACK” button, the tuning frequency will not stop changing even if the frequency of a receivable station is reached.
▲ Seek tuning
If you press the or
 side of the
“SEEK FLDR” button (7), the radio will
automatically search for a receivable
station and stop at the first one it finds.
This function may not be available, however, when radio signals are weak. In such a situation, perform manual tuning to select the desired station.
▲ Automatic tuning (SCAN)
Press the “SCAN” button (8) to change the radio to the SCAN mode. In this mode, the radio scans through the radio band until a station is found. The radio will stop at the station for 5 seconds while displaying the frequency, after which scanning will continue until the entire band has been scanned from the low end to the high end. Press the “SCAN” button again to cancel the SCAN mode and to stop on any displayed frequency.
Press the or
 side of the “SEEK
FLDR” button (7) again to cancel the scan
mode and to stop on any displayed
frequency.
When the “SCAN” button is pressed for automatic tuning, stations are scanned in the direction of low frequencies to high frequencies only.
Automatic tuning may not function properly if the station reception is weakened by distance from the station or proximity to tall buildings and hills.
▲ Selecting preset stations
Presetting a station with a preset button (10) allows you to select that station in a single operation. Up to six, AM, FM1 and FM2 stations each may be preset.
▲ How to preset stations
1. Press the “FM AM” button (2) to select FM1, FM2, or AM reception.
2. Press the “SCAN” button (8) or tune the radio manually until the desired station frequency is displayed.
3. Press and hold one of the preset buttons (10) to store the frequency. If the button is pressed briefly, the preceding selection will remain in memory.
NOTE
• If the connection between the radio and battery is broken for any reason such as vehicle maintenance or radio removal, all stations stored in the preset buttons are cleared. If this occurs, it is necessary to reset the preset buttons.
• If a cell phone is placed near the radio, it may cause the radio to emit noise when it receives calls. This noise does not indicate a radio malfunction.
▲ Satellite radio mode (if equipped)
To receive satellite radio, it is necessary to install the SUBARU genuine satellite receiver (optional part) and to enter into a contract with a satellite radio network service such as “Sirius XMTM satellite radio” (for U.S.A. only) or “Sirius satellite radio” (for Canada only). For details, please contact your SUBARU dealer.
▲ Sirius satellite radio (for Canada only)
Sirius satellite radio is a recent innovation that allows the listener to experience digital sound quality and to have a greater variety of channels.
Use of satellite radio (Sirius) requires a tuner, antenna and a service contract. For details, please contact your SUBARU dealer or visit Sirius Satellite Radio at www.sirius.ca or call 1-888-539-7474 for more information. Sirius, the Sirius dog logo, channel names and logos are trademarks of SIRIUS Satellite Radio Inc.
▲ Sirius XMTM Satellite Radio Activation (for U.S.A. only)
Models with Sirius XMTM are eligible for a 3-month complimentary subscription to the Sirius XMTM Satellite Radio service.
Activation process:
You can activate the XM Satellite Radio from the website of the XM Satellite Radio.
For details, visit the website.
▲ Satellite radio reception
Satellite radio signals are best received in areas with a clear view of the open sky. In areas where there are tall buildings, trees, tunnels or other structures that may obstruct the signal of the satellites, there may be signal interruptions. Other circumstances that may result in signal loss include driving near a wall, steep cliff or hill, or driving on the lower level of a multitiered road or inside a parking garage.
To help reduce this condition, satellite radio providers have installed groundbased repeaters in heavily populated areas. However, you may still experience reception problems in some areas.
▲ Displaying satellite radio ID of tuner
When you activate satellite radio, you should have your satellite radio tuner ID ready because each tuner is identified by its unique satellite radio tuner ID.
The satellite radio ID will be needed when you activate satellite radio and receive satellite radio customer support.
The satellite radio ID can be found on the audio display by tuning the channel to “0”.
Turn the “TUNE TRACK” button (4) to select the satellite radio channel.
▲ Band selection button
Push the “SAT” button (1) when the radio is off to turn on the radio.
Push the “SAT” button when the radio is on to select SAT1, SAT2 or SAT3 reception.
▲ Channel selection
Press  of the “TUNE TRACK”
button
(4) to select the next channel and press
 of the button to select the
previous
channel.
Keep pressing  of the button to
change to the next channel continuously
and keep pressing  of the button to
change to the previous channel continuously.
▲ Category selection
Press or
 of the “SEEK FLDR”
button (7) to display the current category.
Press again to select the next
category, and press  again to
select
the previous category.
▲ Channel scan
Press the “SCAN” button (8) to change the radio to the SCAN mode. In this mode, the radio scans through the channels until a station is found. The radio will stop at the station for 5 seconds while displaying the channel number, after which scanning will continue until the entire channel has been scanned from the low end to the high end.
Also during the category selection, channel scan can be performed in that category.
Press the “SCAN” button again to cancel the SCAN mode and to stop on any displayed channel.
▲ Selecting preset channels
Presetting a channel with a preset button (10) allows you to select that channel in a single operation. Up to six, SAT1, SAT2 and SAT3 channels each may be preset.
▲ How to preset channels
1. Press the “SAT” button (1) to select SAT1, SAT2 and SAT3 reception.
2. Press the “SCAN” button (8) or the “TUNE TRACK” button (4) to select the channel.
3. Press and hold one of the preset buttons (10) to store the channel. If the button is pressed briefly, the preceding selection will remain in memory.
NOTE
If the connection between the radio and battery is broken for any reason such as vehicle maintenance or radio removal, all channels stored in the preset buttons are cleared. If this occurs, it is necessary to reset the preset buttons.
▲ Display selection
Press the “AUDIO” button (5) while receiving satellite radio to change the display as follows.
▲ Rear seat entertainment
If your vehicle is equipped with a Rear Seat Entertainment System, you can enjoy audio outputs from the system through the vehicle’s speakers by pressing the “RSE AUX” button (3). Press the button again to return to the audio set sound.
NOTE
If your vehicle is equipped with a Rear Seat Entertainment System, refer to the Owner’s Manual supplement for the Rear Seat Entertainment System for further details.