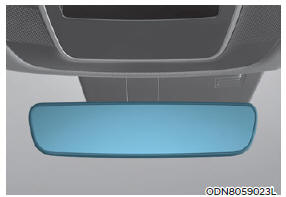
Hyundai Tucson: Inside rearview mirror
Before driving your vehicle, check to see that your inside rearview mirror is properly positioned. Adjust the rearview mirror so that the view through the rear window is properly centered.
WARNING
Make sure your line of sight is not obstructed. Do not place objects in the rear seat, cargo area, or behind the rear headrests which could interfere with your vision through the rear window.
WARNING
To prevent serious injury during an accident or deployment of the air bag, do not modify the rearview mirror and do not install a wide mirror.
WARNING
NEVER adjust the mirror while driving.
This may cause loss of vehicle control resulting in an accident.
NOTICE
When cleaning the mirror, use a paper towel or similar material dampened with glass cleaner. Do not spray glass cleaner directly on the mirror as this may cause the liquid cleaner to enter the mirror housing.
Day/night rearview mirror (if equipped )
![[A]: Day, [B]: Night](images/books/1551/3/index.88.jpg)
[A]: Day, [B]: Night
Make this adjustment before you start driving and while the day/night lever is in the day position.
Pull the day/night lever towards you to reduce glare from the headlamps of the vehicles behind you during night driving.
Remember that you lose some rearview clarity in the night position.
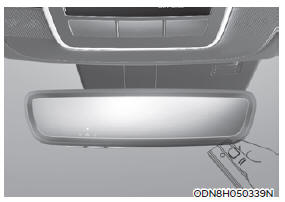
Electrochromic Mirror (if equipped)
The electric rearview mirror automatically controls the glare from the headlamp of the vehicle behind you in nighttime or low light driving conditions.
When the engine is running, the glare is automatically controlled by the sensor mounted in the rearview mirror. The sensor detects the light level around the vehicle, and automatically adjusts to control the headlamp glare from vehicles behind you.
Whenever the the transmission is shifted to R (Reverse), the mirror will automatically go to the brightest setting in order to improve the driver's view behind the vehicle.
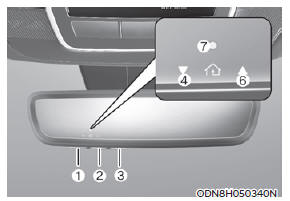
Electrochromic Mirror with Homelin System (if equipped)
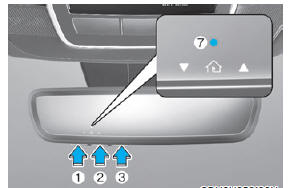
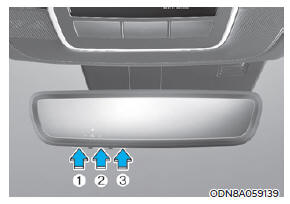
Your vehicle may be equipped with a Gentex Automatic-Dimming Mirror with an Integrated HomeLink Wireless Control System.
During nighttime driving, this feature will automatically detect and reduce rearview mirror glare. The HomeLink Universal Transceiver allows you to activate your garage door(s), electric gate, home lighting, etc.

- HomeLink Channel 1
- HomeLink Channel 2
- HomeLink Channel 3
- Garage Door Opener Status Indicator: Closing or Closed
- HomeLink Operation Indicator
- Garage Door Opener Status Indicator: Opening or Opened
- HomeLink User Interface Indicator
Integrated HomeLink Wireless Control System
The HomeLink Wireless Control System provides a convenient way to replace up to three hand held radio-frequency transmitters used to activate compatible devices such as gate operators, garage door openers, entry door locks, security systems, and home lighting.
NOTICE
HomeLink operates while the ignition switch is in the ACC or ON position for safety reasons. It is to prevent unintentional security problems from happening when the vehicle is parked outside the garage.
WARNING
Before programming HomeLink to a garage door opener or gate operator, make sure people and objects are out of the way of the device to prevent potential harm or damage. Do not use the HomeLink with any garage door opener that lacks the safety stop and reverse features required by U.S. federal safety standards (this includes any garage door opener model manufactured before April 1, 1982).
A garage door that cannot detect an object - signaling the door to stop and reverse - does not meet current U.S.
federal safety standards. Using a garage door opener without these features increases the risk of serious injury or death.
For more information, contact HomeLink at www.homelink.com, or call Home-Link customer support at 1-800-355-3515.
It is also recommended that a new battery be replaced in the handheld transmitter of the device being trained to HomeLink for quicker training and accurate transmission of the radio frequency.
1. Programming HomeLink
The following steps show how to program HomeLink. If you have any questions or are having difficulty programming your HomeLink buttons, refer to the HomeLink website or call the HomeLink customer support toll-free number. Do this before going back to the dealer who sold you the car
- Visit the HomeLink website. Then at the top of the page, choose your vehicle make. Then watch the You Tube video, and/or access additional website information.
- If you choose to access the website
via your cell phone, scan the QR code.

- Or call HomeLink customer support at 1-800-355-3515 (Please have the vehicle make/model and the opener device make/model readily available.)
1) Programming Preparation
- When programming a garage door opener, it is advised to park the vehicle outside of the garage.
- It is recommended that a new battery be placed in the handheld transmitter of the device being programmed to HomeLink for quicker training and accurate transmission of the radiofrequency signal.
- Place the ignition switch to the ACC (Accessory) position for programming of HomeLink.
2) Programming a New HomeLink
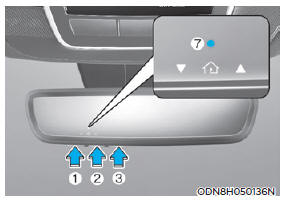
- Press and release the HomeLink button (1), (2) or (3), you would like to program. The HomeLink indicator light (7) will flash orange slowly (if not, perform the steps of "Erasing HomeLink Buttons" section, and start over).
- Position the garage door opener remote 1 - 3 inches (2 - 8cm) away from the HoleLink buttons.
- While the HomeLink indicator light (7) is flashing orange, press and hold the hand-held remote button. Continue pressing the handheld remote button until the HomeLink indicator light (7) changes from orange to green. You may now release the handheld remote button.
- Wait until your garage door comes to a complete stop, regardless of position, before proceeding to the next steps.
- Press and release the HomeLink button you are programming and observe the indicator light.
- If the indicator light remains solid green, your device should operate when the HomeLink button is pressed. At this point, if your device operates, programming is complete.
- If the indicator light rapidly flashes green, firmly press, hold for two seconds and release the HomeLink button up to three times in a row slowly to complete the programming process. Do not press the HomeLink button rapidly. At this point if your device operates, programming is complete. If the device does not operate, continue with step 6.
- At the garage door opener motor, (security gate motor, etc.) locate the "Learn", "Smart", "Set" or "Program" button. This can usually be found where the hanging antenna wire is attached to the motor-head unit (see the device's manual to identify this button). The name and color of the button may vary by manufacturer.

* A ladder and/or second person may simplify the following steps.
- Firmly press and release the "Learn",
"Smart", "Set" or "Program" button.
You now have up to 30 seconds in which to complete the next step.
- Return to the vehicle and firmly press, hold for two seconds and release, the HomeLink button up to three times in a row slowly. Do not press the HomeLink button rapidly. As soon as you see the garage door start to move, stop pressing any buttons until a few seconds after the garage door has come to a complete stop, regardless of position. At this point, programming is complete and your device should operate when the HomeLink button is pressed and released.
3) Two-Way Communication Programming (For select garage door openers)
If your garage door opener has the 'myQ' logo on its side, your opener likely has Two-Way Communication capability. HomeLink has the capability to establish Two-Way Communication with your garage door opener. HomeLink can receive and display "closing" or "opening" status messages from compatible garage door openers. At any time, Home-Link can also recall and display the last recorded status communicated by the garage door opener to indicate your garage door being "closed" or "opened".
To check if your garage door opener is compatible with this feature, refer to www.homelink.com/compatible/Twoway- Communication. If your garage door opener has this functionality, AND the Two-Way Communication indicators (4), (6) in the mirror appear while the garage door is opening/closing, then no further steps are needed. Two-Way Communication Programming is already complete. However, if your garage door opener has this functionality, AND the Two-Way Communication indicators (4), (6) in the mirror DO NOT appear while the garage door is opening/closing, use the following instructions to enable this functionality.
- In your vehicle, press and hold the programmed HomeLink button for 2 seconds, then release. Confirm that the garage door is moving. AFTER it stops, you will have one minute to complete the following steps:
*A ladder and/or second person may simplify the following steps.
- On your garage door opener in your garage, locate the "Learn" button (usually near where the hanging antenna wire is attached to the garage door opener). If there is difficulty locating this button, reference the device's owner's manual.
- Press and release the "Learn" button.
- A light on your garage door opener may flash, and your Two-Way Communication indicators (4), (6) in your vehicle may flash, confirming completion of the process.
- Return to the vehicle and firmly press and release the programmed HomeLink button to activate your garage door. The Two-Way Communication indicators (4), (6) flash in orange when the door is moving. Do not make any additional button presses until AFTER the garage door has come to a complete stop.
- Your Two-Way Communication programming is now complete.
Information
If your garage door opener has Two- Way Communication functionality, it is possible for HomeLink to stop functioning the garage door shortly after initial programming, IF the Two- Way Communication Programming wasn't properly completed. This usually happens after the first 10 times a programmed HomeLink button is pressed. If you experience this, completing the "Programming a New HomeLink Button" and "Two-Way Communication Programming" will restore door operation.
4) Canadian Programming
Canadian radio-frequency laws require transmitter remote signals to "timeout" (or quit) after a couple seconds of transmission, which may not be long enough for HomeLink to pick up the signal during programming.
If you live in Canada or you are having difficulties programming a gate operator or garage door opener by using the programming procedures, replace "Programming a New HomeLink Button" step 3 with the following: While the HomeLink indicator light (7) is flashing orange, press and release ("cycle") your device's handheld remote every two seconds until the HomeLink indicator light (7) changes from orange to green. You may now release the hand-held remote button.
Then proceed with "Programming a New HomeLink Button" step 4.
2. Operating HomeLink
1) Operating HomeLink
- Press and release the desired programmed HomeLink button (1, 2 or 3).
Information
The HomeLink indicator (7) should light green, solid or flashing, and your programmed device should operate.
If your device does not operate, the HomeLink programming was not successful, and you'll need to reprogram the button.
2) Two-Way Communication Display Behavior
- Press and release one of the programmed HomeLink buttons (1, 2 or 3)
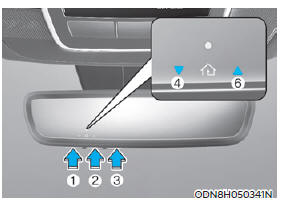
- The indicator (4) and (6) operates as below, if your garage door opener has Two-Way Communication functionality.
- If the indicator (4) flashes in Orange, it indicates that the garage door is "Closing".
- The indicator (4) turns solid green once the garage door has closed.
- If the indicator (6) flashes in Orange, it indicates that the garage door is "Opening".
- The indicator (6) turns solid green once the garage door has fully opened.
- If the indicator (4) or (6) does not turn to green, it indicates that the last status of garage door was not received properly. The HomeLink mirror tries to receive the last known status of the garage door for a few seconds.
3) Recalling Garage Door Status
HomeLink mirror with Two-Way Communication provides a way to view the last stored message from the garage door opener. In order to recall the last known status of the last activated device, press the buttons "1 and 2" OR "2 and 3" simultaneously.
- If the indicator (4) appears solid Green, it indicates that the last activated device was "closed" properly.
- If the indicator (6) appears solid Green, it indicates that the last activated device was "open" properly.
3. Erasing HomeLink Buttons
1) Erasing and Reprogramming a Single HomeLink Button:
- Press and hold the desired HomeLink button you want to re-program. DO NOT release the button.
- The HomeLink indicator light (7) will illuminate solid green. Release the button as soon as the HomeLink indicator light (7) begins to flash orange, usually about 20 seconds.
- Proceed with the steps in the "Programming a New HomeLink Button" section.
Information
If you do not complete the reprogramming of a new device to the button, it will revert to the previously stored programming.
2) The following instructions will erase ALL HomeLink programming from ALL buttons:

- Press and hold the buttons (1) and (3) simultaneously.
- The HomeLink indicator light (7) will illuminate solid Orange for about 10 seconds.
- Release the buttons once the HomeLink indicator light (7) changes to Green and flashes rapidly.
- Now all three HomeLink buttons (1), (2) and (3) are cleared of any programming.
Information
HomeLink and the HomeLink House logo are registered trademarks of Gentex Corporation.
The myQ logo is a registered trademark of The Chamberlain Group, Inc.
FCC (USA) and ISED (Canada)
This device complies with FCC rules part 15 and Innovation, Science, and Economic Development Canada RSS- 210. Operation is subject to the following two conditions: (1) This device may not cause harmful interference, and (2) This device must accept any interference that may be received including interference that may cause undesired operation.
WARNING: The transmitter has been tested and complies with FCC and ISED rules. Changes or modifications not expressly approved by the party responsible for compliance could void the user's authority to operate the device.
This equipment complies with FCC and ISED radiation exposure limits set forth for an uncontrolled environment.
End Users must follow the specific operating instructions for satisfying RF exposure compliance. This transmitter must be at least 20cm from the user and must not be co-located or operating in conjunction with any other antenna or transmitter.
FCC (Htats-Unis) et ISED (Canada)
Cet appareil est conforme aux règlements de la FCC, section 15, et au CNR-210 d'Innovation, Sciences et Dhveloppement économique Canada. Le fonctionnement est assujetti aux deux conditions suivantes : (1) cet appareil ne doit pas causer d'interférences nuisibles et (2) cet appareil doit accepter toute interférence reçue, y compris celle qui pourrait entraîner un dysfonctionnement.
MISE EN GARDE : L'émetteur a subi des tests et est conforme aux règlements de la FCC et d'ISDE. Les changements ou modifications non approuvés explicitement par la partie responsable de la conformité pourraient rendre caduque l'autorisation de l'utilisateur de se servir du dispositif.
Cet appareil est conforme aux limites d'exposition aux radiations de la FCC et d'ISDE établies pour un environnement non contrôlé. Les utilisateurs finaux doivent respecter les instructions d'utilisation spécifiques pour satisfaire aux exigences de conformité aux expositions de RF.
L'émetteur doit se trouver à 20 cm au minimum de l'utilisateur et ne doit pas être situé au même endroit que tout autre émetteur ou antenne ni fonctionner avec un autre émetteur ou antenne.
Méjico
La operación de este equipo está sujeta a las siguientes dos condiciones: (1) es posible que este equipo o dispositivo pueda no causar interferencia dañina, y (2) este dispositivo o dispositivos deben aceptar cualquier interferencia, que incluye la interferencia que puede causar su operación no deseada.
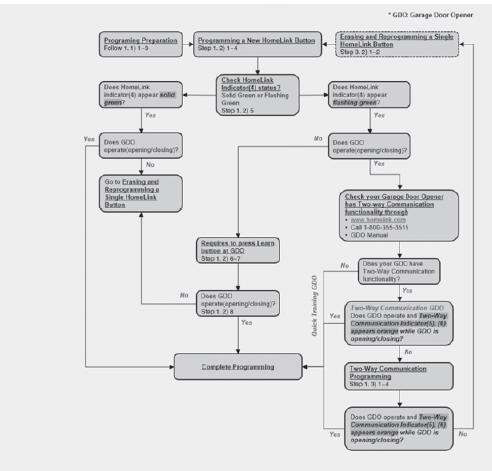
HomeLink 5 Programing Flow Chart
READ NEXT:
 Side View mirrors
Your vehicle is equipped with both lefthand
and right-hand side view mirrors.
The mirrors can be adjusted remotely
with the mirror adjustment control
switch. The side view mirrors can be
folded manually to help prevent damage
when going t
Windows
Driver's door power window switch
Front passenger's door power
window switch
Rear door (left) power window switch
Rear door (right) power window
switch
Window opening and closing
Automatic power window*
Power window lock switch
Panoramic sunroof
If your vehicle is equipped with a
sunroof, you can slide or tilt your sunroof
with the sunroof switch located on the
overhead console.
The sunroof can only be operated when
the ignition switch or Engine Start/Stop
button is in the ON or ST
SEE MORE:
Side airbag (SAB)
Components Location
Side airbag (SAB)
Removal
Disconnect the batteiy negative terminal.
WARNING
After disconnecting the cables, wait at least 3 minutes.
Remove the front seat back cover.
(Refer to Body - "Front Seat Back
Oil cooler pipe
Remove the heater pipe
Disconnect the oil cooler hose (A) from the ITM.
Disconnect the oil cooler hose (A) from the oil cooler.
Rmove the oil cooler pipe (A) after loosening the mounting bolts.
Tightening torque :
9.8 - 1
Information
- Home
- Hyundai Tucson - Fourth generation (NX4) - (2020-2023) - Owner's Manual
- Hyundai Tucson - Fourth generation (NX4) - (2020-2023) - Workshop Manual
