Hyundai Tucson: Lighting
Exterior lights
Lighting control
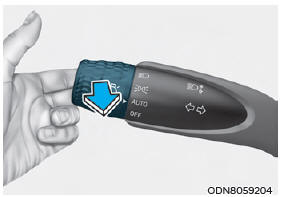
To operate the lights, turn the knob at the end of the control lever to one of the following positions:
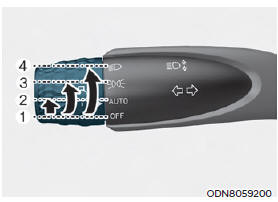
- OFF position
- AUTO headlamp position
- Position lamp position
- Headlamp position
Daytime Running Light (DRL)
The Daytime Running Lights (DRL) can make it easier for others to see the front of your vehicle during the day, especially after dawn and before sunset. The Daytime Running Lights (DRL) should be illuminated whenever you are driving during daylight hours. The DRL system will be ON when the headlamp stalk is in the OFF or the AUTO Position (when daylight is detected) and the Electronic Parking Brake (EPB) is released.
The DRL system will turn off when:
- The headlamps are ON.
- The parking brake is applied.
- The vehicle is turned off.
- Parking Brake is applied
AUTO headlamp position
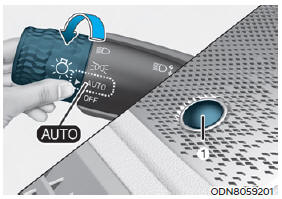
The position lamp and headlamp will be turned ON or OFF automatically depending on the amount of daylight as measured by the ambient light sensor (1) at the upper end of the windshield glass.
Even with the AUTO headlamp feature in operation, it is recommended to manually turn ON the headlamps when driving at night or in a fog, driving in the rain, or when you enter dark areas, such as tunnels and parking facilities.
NOTICE
- Do not cover or spill anything on the sensor (1) located at the upper end of the windshield glass.
- Do not clean the sensor using a window cleaner, the cleanser may leave a light film which could interfere with sensor operation.
- If your vehicle has window tint or other types of metallic coating on the front windshield, the AUTO headlamp system may not work properly.
Position lamp position

Position lamp position ( )
)
The position lamp, license plate lamp and instrument panel lamp are turned ON.
Headlamp position
Headlamp position (
 )
)
The headlamp, position lamp, license plate lamp and instrument panel lamp are turned ON.
Information
The ignition switch must be in the ON position to turn on the headlamp.
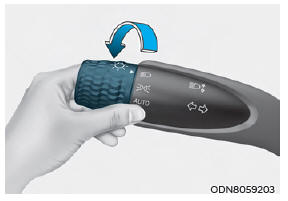
High beam operation
To turn on the high beam headlamp, push the lever away from you. The lever will return to its original position.
The high beam indicator will light when the headlamp high beams are switched on.
To turn off the high beam headlamp, pull the lever towards you. The low beams will turn on.
WARNING
Do not use high beam when there are other vehicles approaching you. Using high beam could obstruct the other driver's vision.
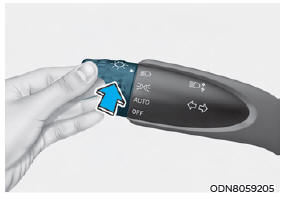
To flash the high beam headlamp, pull the lever towards you, then release the lever. The high beams will remain ON as long as you hold the lever towards you.
Turn signals and lane change signals
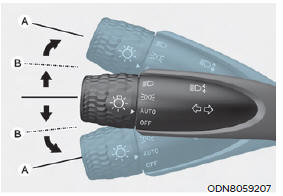
To signal a turn, push down on the lever for a left turn or up for a right turn in position (A).
If an indicator stays on and does not flash or if it flashes abnormally, one of the turn signal bulbs may be burned out and will require replacement.
One touch turn signal
To use One Touch Turn Signal push the turn signal lever up or down to position (B) and then release it.
The lane change signals will blink 3, 5 or 7 times.
You can enable the One Touch Turn Signal function or choose the number of blinking by selecting 'Setup → User Settings → Lights → One Touch Turn Signal → Off/3 flashes/5 flashes/7 flashes' in the instrument panel LCD cluster.
Battery saver function
The purpose of this feature is to prevent the battery from being discharged.
The system automatically turns off the position lamp when the driver turns the vehicle off and opens the driver-side door.
With this feature, the position lamps will turn off automatically if the driver parks on the side of road at night.
If necessary, to keep the lamps on when the vehicle is turned off, perform the following:
- Open the driver-side door.
- Turn the position lamps OFF and ON again using the headlamp switch on the steering column.
Headlamp delay function
If you place the ignition switch to the ACC position or the OFF position with the headlamps ON, the headlamps (and/ or position lamps) remain on for about 5 minutes. However, if the driver's door is opened and closed, the headlamps are turned off after 15 seconds. Also, with the vehicle off if the driver's door is opened and closed, the headlamps (and/ or position lamps) are turned off after 15 seconds.
The headlamps (and/or position lamps) can be turned off by pressing the lock button on the remote key or smart key twice or turning the headlamp switch to the OFF or AUTO position.
You can enable the headlamp delay function by selecting 'Setup → User Settings → Lights → Headlight Delay.
NOTICE
If the driver exits the vehicle through another door besides the driver door, the battery saver function does not operate and the headlamp delay function does not turn OFF automatically.
This may cause the battery to discharge. To avoid battery discharge, turn OFF the headlamps manually from the headlamp switch before exiting the vehicle
READ NEXT:
 High Beam Assist (HBA)
High Beam Assist will automatically
adjust the headlamp range (switches
between high beam and low beam)
depending on the brightness of detected
vehicles and certain road conditions.
Detecting sensor (Front view camera)
[1] : Front view
Interior lights
WARNING
Do not use the interior lights when
driving in the dark. The interior lights
may obscure your view and cause an
accident.
NOTICE
Do not use the interior lights for
extended periods when the vehicle is
turned off or the battery will di
Wipers and washers
A. Wiper speed control (front)
MIST - Single wipe
OFF - Off
INT - Intermittent wipe AUTO* - Auto control wipe
LO- Low wiper speed
HI - High wiper speed
B. Intermittent control wipe time
adjustment
C. Wash with brief w
SEE MORE:
Windshield Glass - Replacement
Components
Windshield glass
Windshield glass upper molding
Replacement
WARNING
Put on gloves to prevent hand injuries.
WARNING
Use seat covers to avoid damaging any surfaces.
Remove the front pillar trim.
(Refer to Interior Tri
Mass Air Flow Sensor (MAFS)
Description
MAFS uses a hot-film type sensing element to measure the mass of intake air
entering the engine, and
send the signal to ECM.
A large amount of intake air represents acceleration or high load conditions
while a small amount of
in
Information
- Home
- Hyundai Tucson - Fourth generation (NX4) - (2020-2023) - Owner's Manual
- Hyundai Tucson - Fourth generation (NX4) - (2020-2023) - Workshop Manual
