Hyundai Tucson: Light bulbs
We recommend that you consult an authorized HYUNDAI dealer to replace most vehicle light bulbs. It is difficult to replace vehicle light bulbs because other parts of the vehicle must be removed before you can get to the bulb.
This is especially true for removing the headlamp assembly to get to the bulb(s).
Removing/installing the headlamp assembly can result in damage to the vehicle.
WARNING
- Prior to working on a light, depress the foot brake, shift to P (Park), apply the parking brake, press the Engine Start/Stop button to the OFF position and take the key with you when leaving the vehicle to avoid sudden movement of the vehicle and to prevent possible electric shock.
- Be aware the bulbs may be hot and may burn your fingers.
NOTICE
Be sure to replace the burned-out bulb with one of the same wattage rating.
Otherwise, it may cause damage to the fuse or electrical wiring system.
NOTICE
To prevent damage, do not clean the headlamp lens with chemical solvents or strong detergents.
Information - Headlamp desiccant (if equipped)
This vehicle is equipped with desiccant to reduce fogging inside the headlamp due to moisture. The desiccant is consumable and its performance may change based on the used period or environment. If fogging inside the headlamp due to moisture continues for a long time, we recommend that you consult an authorized HYUNDAI dealer.
Information
The headlamp and tail lamp lenses could appear frosty if the vehicle is washed after driving or the vehicle is driven at night in wet weather. This condition is caused by temperature difference between the lamp inside and outside and, it does not indicate a problem with your vehicle.
When moisture condenses in the lamp, it will be removed after driving with the headlamp on. The removable level may differ depending on lamp size, lamp position and environmental condition.
However, if moisture is not removed, we recommend that your vehicle is inspected by an authorized HYUNDAI dealer.
Information
- A normally functioning lamp may
flicker momentarily to stabilize the
vehicle's electrical control system.
However, if the lamp goes out after flickering momentarily, or continues to flicker, we recommend the system be checked by an authorized HYUNDAI dealer.
- The position lamp may not turn on when the position lamp switch is turned on, but the position lamp and headlamp switch may turn on when the headlamp switch is turned on. This may be caused by network failure or vehicle electrical control system malfunction. If this occurs, we recommend the system be checked by an authorized HYUNDAI dealer.
Information
The headlamp aiming should be adjusted after an accident or after the headlamp assembly is reinstalled.
Headlamp, position lamp, turn signal lamp, Daytime Running Light (DRL) replacement
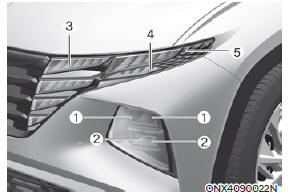
- Headlamp (Low)
- Headlamp (High)
- Daytime running light/ Position light
- Turn signal lamp
- Side marker
If the LED lamp does not operate, we recommend that the system be inspected by an authorized HYUNDAI dealer. The LED lamps cannot be replaced as a single unit because it is an integrated unit. The LED lamps has to be replaced with the unit. A skilled technician should check or repair the LED lamp, for it may damage related parts of the vehicle.
Side repeater lamp replacement
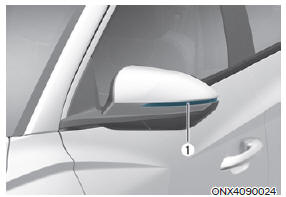
If the LED lamp (1) does not operate, we recommend that the system be inspected by an authorized HYUNDAI dealer.
The LED lamps cannot be replaced as a single unit because it is an integrated unit. The LED lamps has to be replaced with the unit.
A skilled technician should check or repair the LED lamp, for it may damage related parts of the vehicle.
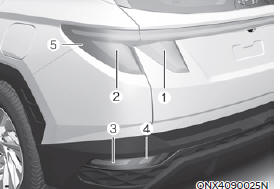
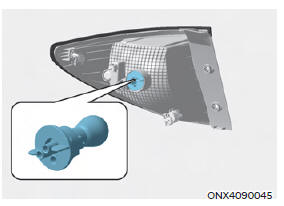
Rear combination lamp replacement
Type A
Type B
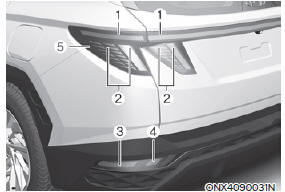
- Tail lamp
- Tail/Stop lamp
- Turn signal lamp
- Reverse lamp
- Rear side marker
Stop/Tail lamp (Outside)
- Turn off the engine.
- Open the liftgate.
- Loosen the lamp assembly retaining screws with a cross-tip screwdriver.
- Remove the rear combination lamp assembly from the body of the vehicle.
- Remove the socket from the assembly by turning the socket counterclockwise until the tabs on the socket align with the slots on the assembly.
- Remove the bulb from the socket
by pressing it in and rotating it
counterclockwise until the tabs on the
bulb align with the slots in the socket.
Pull the bulb out of the socket.
- Insert a new bulb by inserting it into the socket and rotating it until it locks into place.
- Install the socket into the assembly by aligning the tabs on the socket with the slots in the assembly. Push the socket into the assembly and turn the socket clockwise.
- Reinstall the lamp assembly to the body of the vehicle.
Tail lamp (Inside)
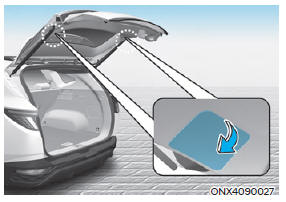
- Turn off the engine.
- Open the liftgate.
- Remove the service cover using a flat-blade screwdriver.
- Remove the socket from the assembly by turning the socket counterclockwise until the tabs on the socket align with the slots on the assembly.

- Remove the bulb from the socket
by pressing it in and rotating it
counterclockwise until the tabs on the
bulb align with the slots in the socket.
Pull the bulb out of the socket.
- Insert a new bulb by inserting it into the socket and rotating it until it locks into place.
- Install the socket into the assembly by aligning the tabs on the socket with the slots in the assembly. Push the socket into the assembly and turn the socket clockwise.
- Reinstall the lamp assembly to the body of the vehicle.
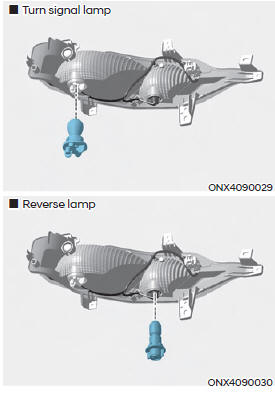
Turn signal lamp/Reverse lamp
- Turn off the engine.
- Remove the socket from the assembly by turning the socket counterclockwise until the tabs on the socket align with the slots on the assembly.
- Remove the bulb from the socket
by pressing it in and rotating it
counterclockwise until the tabs on the
bulb align with the slots in the socket.
Pull the bulb out of the socket.
- Insert a new bulb by inserting it into the socket and rotating it until it locks into place.
Stop&Tail lamp/Rear side marker (LED type)
If the LED lamp does not operate, we recommend that the system be inspected by an authorized HYUNDAI dealer.
The LED lamps cannot be replaced as a single unit because it is an integrated unit. The LED lamps has to be replaced with the unit.
A skilled technician should check or repair the LED lamp, for it may damage related parts of the vehicle.
High mounted stop lamp replacement
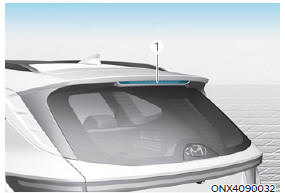
If the LED lamp (1) does not operate, we recommend that the system be inspected by an authorized HYUNDAI dealer.
The LED lamps cannot be replaced as a single unit because it is an integrated unit. The LED lamps has to be replaced with the unit.
A skilled technician should check or repair the LED lamp, for it may damage related parts of the vehicle.
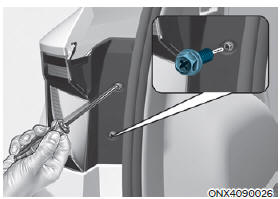
License plate lamp replacement
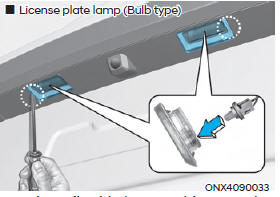
- Using a flat-blade screwdriver, gently pry the lens cover from the lamp housing.
- Remove the bulb by pulling it straight out.
- Install a new bulb.
- Reinstall in the reverse order.
License plate lamp (LED type)
If the LED lamp does not operate, we recommend that the system be inspected by an authorized HYUNDAI dealer.
The LED lamps cannot be replaced as a single unit because it is an integrated unit. The LED lamps has to be replaced with the unit.
A skilled technician should check or repair the LED lamp, for it may damage related parts of the vehicle.
Interior light replacement
Map/Personal lamp (LED)
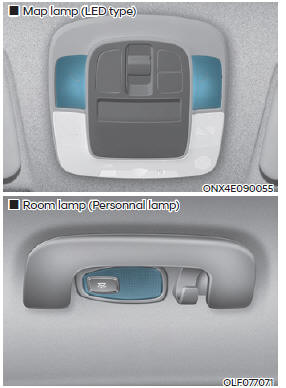
If the LED lamp does not operate, we recommend that the system be inspected by an authorized HYUNDAI dealer.
The LED lamps cannot be replaced as a single unit because it is an integrated unit. The LED lamps has to be replaced with the unit.
A skilled technician should check or repair the LED lamp, for it may damage related parts of the vehicle.
Map lamp, Room lamp, Sunvisor lamp and Luggage compartment lamp (Bulb type)
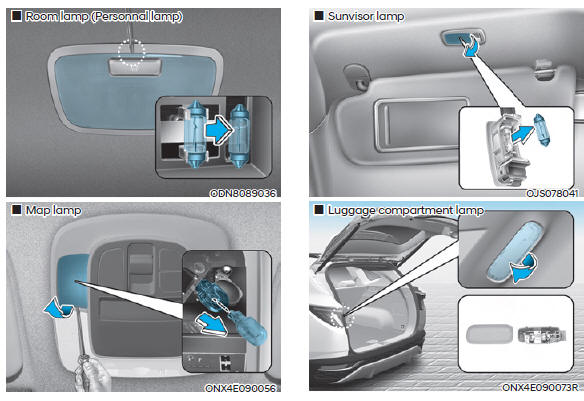
- Using a flat-head screwdriver, gently pry the lens from the interior light housing.
- Remove the bulb by pulling it straight out.
- Install a new bulb into the socket.
- Align the lens tabs with the interior light housing notches and snap the lens into place.
NOTICE
Be careful not to damage the cover, tab, and plastic housing.
READ NEXT:
 Exterior care
Exterior general caution
It is very important to follow the label
directions when using any chemical
cleaner or polish. Read all warning and
caution statements that appear on the
label.
Finish maintenance
Washing
To help protect your vehicle'
Interior care
Interior general precautions
Prevent caustic solutions such as
perfume and cosmetic oil, from
contacting the interior parts because
they may cause damage or discoloration.
If they do contact the interior parts,
wipe them off immediately. See
SEE MORE:
Immobilizer System - Removal
Removal
Disconnect the negative (-) battery terminal.
Remove the heater control unit.
(Refer to Heating,Ventilation And Air Conditioning - "Heater Control Unit")
Loosen the mounting bolt,nut,screw and remove the Integrated Body
Air Conditioning System - Instructions (R- 134a)
When Handling Refrigerant
R-134a liquid refrigerant is highly volatile. A drop on the skin of your
hand could result in localized
frostbite. When handling the refrigerant, be sure to wear gloves.
It is standard practice to wear goggles or
Information
- Home
- Hyundai Tucson - Fourth generation (NX4) - (2020-2023) - Owner's Manual
- Hyundai Tucson - Fourth generation (NX4) - (2020-2023) - Workshop Manual
